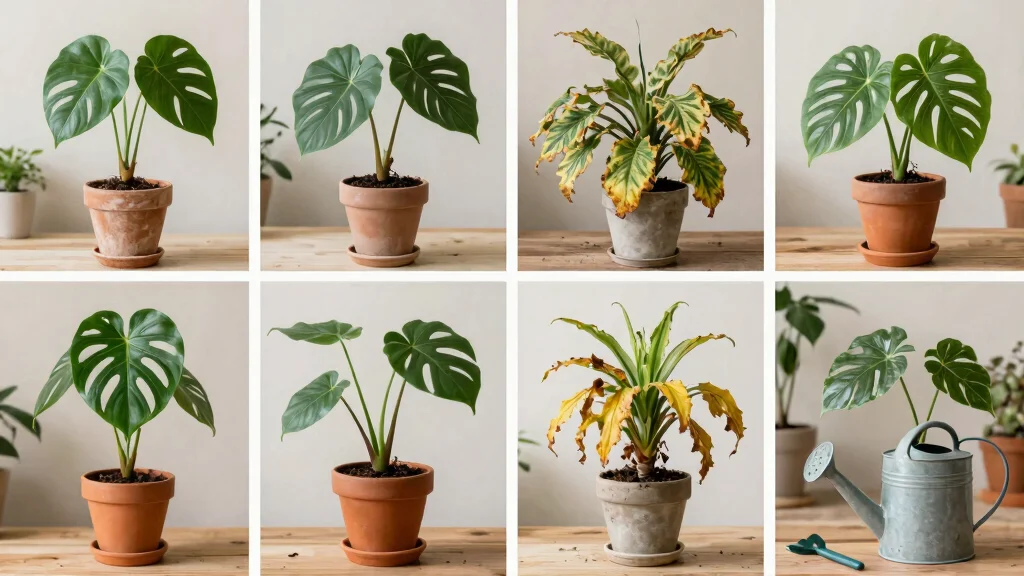
Houseplants have a special way of brightening up our homes, don’t they? Yet, we’ve all been in that heartbreaking situation—watching our beloved plants struggle and fade away. This post is here to change that story. With a passion for indoor gardening and a desire to help plants thrive, I’ve compiled some inspiring tales of recovery. From droopy leaves to lush greenery, these transformations show that with care, attention, and a few tricks up your sleeve, you can breathe new life into any plant.
If you’re someone who loves nurturing plants but sometimes feels overwhelmed by their needs, this one’s for you. Whether you’re a seasoned plant parent or just starting your indoor jungle, you’ll find practical tips and revitalization techniques that fit your lifestyle. In this article, I’ll showcase 10 rescued dying houseplants and their stunning before-and-after stories. You’ll gain insights into how you can apply similar techniques to your plants, bringing them back from the brink of despair.
Get ready to be inspired! You’ll learn about the unique challenges each plant faced and the specific actions taken to revive them. Plus, I’ll share key houseplant care tips that will help you maintain a thriving indoor garden. By the end of this post, you’ll feel empowered to tackle your own plant rescue projects, eager to transform your home into a flourishing oasis.
Key Takeaways
– Discover the specific revitalization techniques used for each plant, from watering schedules to light adjustments.
– Learn how to identify signs of distress in your houseplants to tackle issues early.
– Find out which houseplant care tips are most effective for common varieties like Fiddle Leaf Figs and Snake Plants.
– Gain insights from real-life transformation stories that will motivate you to rescue your own plants.
– Understand the importance of patience and observation in the plant revival process for lasting health.
1. The Fiddle Leaf Fig: A Dramatic Change
If you adore the Fiddle Leaf Fig with its impressive, large leaves, you might also know how quickly it can decline with too much water or not enough light. Transforming a struggling fig can be a rewarding journey, bringing new life to your space. With the right care, you can nurture this beauty back to health, showcasing its vibrant potential.
Start by ensuring the plant has excellent drainage and adjust its location for optimal sunlight. Regularly prune damaged leaves and maintain a consistent watering schedule to promote growth. This approach not only revitalizes your plant but also enhances your living space.
Key steps for a thriving Fiddle Leaf Fig:
– Avoid over-watering to prevent root rot.
– Position near a bright window for optimal light.
– Wipe leaves gently to remove dust and boost photosynthesis.
With these simple adjustments, your Fiddle Leaf Fig will flourish, showcasing lush, glossy leaves that elevate your home decor.
📹 Related Video: Fiddle Leaf Fig – Care & Rescue Tips
Ongoing Maintenance & Care Guide
Maintenance Schedule:
Daily/Weekly Tasks:
– Check soil moisture: Stick your finger about an inch into the soil. If it feels dry, it’s time to water. ⏱ (5 minutes)
– Dust leaves: Use a damp cloth to remove dust from leaves. This helps with photosynthesis. 💧 (10 minutes)
– Rotate plants: Turn your plants every couple of weeks for even growth. 🌱 (2 minutes)
Monthly/Seasonal Tasks:
– Fertilize: Use a balanced fertilizer during the growing season. Follow package instructions for dilution. 📅 (15 minutes)
– Prune dead leaves: Snip off any yellow or brown leaves to encourage new growth. ✂️ (10 minutes)
– Inspect for pests: Look closely for bugs or webs on the leaves and stems. Early detection is key! 🐜 (10 minutes)
– Repot as needed: If roots are growing out of the drainage holes, consider moving the plant to a larger pot. 🌿 (30 minutes)
– Check humidity levels: If your plant loves moisture, use a humidity gauge to keep levels optimal. 💧 (5 minutes)
Maintenance Summary Table:
| Task | Frequency | Difficulty | Time Needed |
|————————–|—————|———————|————–|
| Check soil moisture | Daily/Weekly | Easy | 5 minutes |
| Dust leaves | Weekly | Easy | 10 minutes |
| Rotate plants | Biweekly | Very Easy | 2 minutes |
| Fertilize | Monthly | Moderate | 15 minutes |
| Prune dead leaves | Monthly | Easy | 10 minutes |
| Inspect for pests | Monthly | Moderate | 10 minutes |
| Repot as needed | As needed | Moderate to Hard | 30 minutes |
| Check humidity levels | Monthly | Easy | 5 minutes |
Common Issues to Watch For:
⚠️ Yellowing leaves: This could mean overwatering. Check the soil to see if it’s too wet.
⚠️ Brown tips on leaves: This often indicates low humidity or underwatering. Increase humidity and check your watering schedule.
⚠️ Slowed growth: If your plant seems stagnant, it may need fertilizer or a larger pot.
⚠️ Pest infestations: Look for tiny insects or webbing. Act quickly to prevent spreading.
⚠️ Fungal growth: Mold on the soil means too much moisture. Allow the soil to dry out before watering again.
Care Tips:
💡 Group plants together: This creates a humid microclimate that can benefit all your plants.
💡 Use proper drainage: Always ensure pots have holes for water to escape. This prevents root rot.
💡 Adjust lighting: Pay attention to how much light each plant gets. Move them closer to or further from windows as needed.
💡 Watering technique: Instead of pouring water directly on the leaves, water the soil. This keeps the leaves dry and healthy.
💡 Seasonal adjustments: In winter, many plants need less water and light. Be sure to adjust care routines according to the season.
With these ongoing maintenance and care tips, your rescued dying houseplants can thrive and flourish in your home. Regular attention to their needs can make all the difference in their health and appearance. Enjoy nurturing your indoor green companions!
The Fiddle Leaf Fig: A Dramatic Change
Editor’s Choice

Fiskars Bypass Pruning Shears, 5/8″ Cut Capacity Gardening Scissors, Sel…

XLUX Long Probe Deep Use Soil Moisture Meter, Water Monitor Indicator Se…

GooingTop LED Grow Light,6000K Full Spectrum Clip Plant Growing Lamp wit…
2. The Snake Plant: From Lifeless to Lively
The Snake Plant is often called the ultimate survivor, but neglect can leave it looking sad and lifeless. Reviving a struggling snake plant is simpler than you might think, and the results can be stunning. With just a few adjustments, you can restore its health and bring back its vibrant green color.
Begin by examining the roots for any signs of rot and move it to a brighter spot for more light. Repotting it into fresh, well-draining soil can also work wonders. These steps not only rejuvenate the plant but also improve the air quality in your home.
Quick recovery actions:
– Inspect roots and trim away any mushy sections.
– Repot using quality, draining soil.
– Gradually increase light exposure to avoid shock.
After following these tips, your Snake Plant will stand tall and proud, showcasing its resilience and adding character to your space.
The Snake Plant: From Lifeless to Lively
Editor’s Choice

Miracle-Gro Water Soluble All Purpose Plant Food – Fertilizer For All In…
GooingTop LED Grow Light,6000K Full Spectrum Clip Plant Growing Lamp wit…

Miracle-Gro Indoor Potting Mix for Cactus and Succulent, Fast-Draining C…
3. The Pothos: A Quick Revival
Pothos plants are perfect for beginners, but even these resilient vines can suffer from neglect if kept in low light. Reviving a Pothos is quick and easy, allowing you to enjoy its lush greenery once more. With a few simple changes, you can watch this plant thrive and beautify your home.
Start by trimming any unhealthy stems and relocating the plant to a brighter spot. Regular watering when the top inch of soil feels dry will ensure it stays healthy. These straightforward adjustments can lead to a vibrant and bushy vine that enhances your living area.
Essential tips for Pothos care:
– Trim regularly to promote fuller growth.
– Water when soil feels dry to the touch.
– Fertilize monthly during the growing season for extra boost.
As a result, your Pothos will flourish into a beautiful, cascading vine, breathing life into any room.
Fun fact: a pothos can bounce back in days with a simple trim and brighter light. A quick rescued dying houseplant before after tells you the story—snip the unhealthy stems, water when the top inch dries, and watch it thrive.
The Pothos: A Quick Revival
Editor’s Choice

XLUX Soil Moisture Meter (Since 2015) – Durable 304 Stainless Steel Prob…

GYTF Halo Plant Grow Light, 6000K White LED Full Spectrum Growing Lamp f…

2-Pack Stainless Steel Gardening Scissors, Pruning Shears and Clippers f…
4. The Rubber Plant: A Reviving Journey
Rubber Plants are famous for their sturdy, glossy leaves, but they can become leggy and sad if they don’t get enough light. Bringing a Rubber Plant back to life is a fulfilling task, and the results can be quite dramatic. With proper care and attention, you can encourage it to grow fuller and healthier.
First, move your Rubber Plant to a brighter location, gradually increasing its exposure to light. Pruning any sparse or unhealthy leaves will help it focus on new growth. This approach not only revitalizes your plant but also enhances the overall aesthetic of your space.
Strategies for revitalizing your Rubber Plant:
– Shift to a brighter area gradually to prevent shock.
– Clean leaves to allow for better light absorption.
– Fertilize every two months in spring and summer for nutrient support.
With these steps, your Rubber Plant will thrive with a fuller canopy of rich green leaves, showcasing its true beauty.
The Rubber Plant: A Reviving Journey
Editor’s Choice
Fiskars Bypass Pruning Shears, 5/8″ Cut Capacity Gardening Scissors, Sel…
GooingTop LED Grow Light,6000K Full Spectrum Clip Plant Growing Lamp wit…
Miracle-Gro Indoor Potting Mix for All Plants, Use with Houseplants and …
5. The Peace Lily: Resilience in Bloom
Peace Lilies are cherished for their elegant white flowers, yet they often struggle without proper care. Reviving a drooping Peace Lily can be incredibly rewarding, and it brings beauty back into your home. With some adjustments, you can witness the return of its lovely blooms.
Begin by revising your watering routine and increasing the humidity around the plant. Regularly checking for proper moisture levels will help keep it healthy and happy. These changes not only revitalize your Peace Lily but also enhance the ambiance of your living space.
Tips for nurturing your Peace Lily:
– Water consistently to maintain moisture without sogginess.
– Boost humidity using a pebble tray or misting.
– Use balanced fertilizer during the growing season for optimal growth.
The outcome is a rejuvenated Peace Lily, showcasing vibrant blooms and enhancing your home with its elegant charm.
Fun fact: Rescued dying houseplant before after stories aren’t myths—Peace Lilies bounce back beautifully. With steady watering, higher humidity, and bright, indirect light, most bloom again within 2-4 weeks.
The Peace Lily: Resilience in Bloom
Editor’s Choice
Pinkunn 2 Pcs Bonsai Humidity Tray Rectangular Drip Tray Plastic Plant W…

Klein Tools ET140 Pinless Moisture Meter for Non-Destructive Moisture De…
6. The ZZ Plant: Overcoming the Odds
ZZ Plants are well-known for their resilience, but they can still show signs of neglect when under-watered. Reviving a droopy ZZ Plant is not only possible but can be quite satisfying. With a few simple steps, you can restore its glossy appearance and health.
Start by giving your plant a thorough watering and then adjust its light conditions to prevent future stress. Regularly maintaining proper moisture will help keep it thriving. These actions not only restore beauty but also improve air quality in your home.
Effective techniques for ZZ Plant recovery:
– Water thoroughly and allow the soil to dry out between sessions.
– Keep it out of direct sunlight to prevent leaf burn.
– Dust leaves often to enhance photosynthesis.
With these straightforward steps, your ZZ Plant will stand tall and shiny, demonstrating its remarkable resilience.
The ZZ Plant: Overcoming the Odds
Editor’s Choice

BEADNOVA Squeeze Plant Watering Bottle 250ml 8oz Small Wash Bottle Squee…
GooingTop LED Grow Light,6000K Full Spectrum Clip Plant Growing Lamp wit…

Dr.meter 4-in-1 Soil Moisture Meter, 300ft Wireless Soil Tester Sensor, …
7. The African Violet: Flourishing with Care
African Violets are famous for their breathtaking flowers, but they can struggle without the right conditions. Reviving a wilting African Violet is a rewarding challenge, and it’s easier than you think. With some adjustments, you can enjoy a stunning display of colorful blooms.
Start by stabilizing your watering routine to ensure consistent moisture and placing it near a reliable light source. Regular care will encourage new blooms and vibrant foliage. These simple changes can transform your plant and brighten your space.
Care tips for flourishing African Violets:
– Keep soil moist but not overly wet.
– Use distilled water to prevent mineral buildup.
– Fertilize every couple of weeks during blooming for healthier growth.
The result is a spectacular African Violet, bursting with beautiful flowers and happiness!
The African Violet: Flourishing with Care
Editor’s Choice

House Plant Journal: a planner, log book, and diary for your indoor gard…
Watering Can for Indoor Plants, Flower Watering Can, Plastic Water Can f…

COOLJOB 2 Pairs Gardening Gloves for Women Ladies, Breathable Rubber Coa…
8. The Boston Fern: Back to Life
Boston Ferns are lush and fabulous, yet they are notorious for drying out quickly. Resurrecting a stressed Boston Fern can be a gratifying endeavor, and the results can be breathtaking. With the right care, you can restore its beauty and lushness.
Start by increasing humidity around the plant and relocating it to a shadier spot to prevent further drying. Regular watering will help maintain consistent moisture. These adjustments not only revive the fern but also beautify your living area.
Key techniques for rejuvenating Boston Ferns:
– Mist regularly or set on a pebble tray to boost humidity.
– Keep out of direct sunlight to protect its leaves.
– Water frequently to keep the soil moist but not soggy.
The revival is stunning, with lush fronds cascading beautifully, showcasing the fern’s natural elegance.
The Boston Fern: Back to Life
Editor’s Choice
XLUX Long Probe Deep Use Soil Moisture Meter, Water Monitor Indicator Se…

YOKEKON Humidifier Large Room 5.8Gal/22L, 2500 sq.ft. Cool Mist Humidifi…
9. The Spider Plant: A Rejuvenated Classic
Spider Plants are beloved for their air-purifying qualities and easy care, but they can become shabby if neglected. Reviving a tired Spider Plant is an achievable goal, and the results can be quite impressive. With a little attention, you can bring back its vibrant charm.
Start by ensuring consistent watering and repotting it in fresh soil for a nutrient boost. A good trim can also help it regain its shape and vitality. These steps can enhance your space while improving the plant’s health.
Essential techniques for Spider Plant recovery:
– Water consistently and check for good drainage.
– Fertilize monthly during the growing season for extra nutrients.
– Propagate the baby plants to share with friends or create new pots.
Now, your Spider Plant cascades beautifully, displaying vibrant green foliage and charming offsets!
Turning a rescued dying houseplant before after into a thriving centerpiece is simpler than you think—water consistently, repot into fresh soil, and give it a trim. Watch the Spider Plant rebound with vibrant leaves and easy care in no time.
The Spider Plant: A Rejuvenated Classic
Editor’s Choice

Miracle-Gro Moisture Control Potting Mix – Plant Soil For Container Plan…
Fiskars Bypass Pruning Shears, 5/8″ Cut Capacity Gardening Scissors, Sel…

Miracle-Gro Indoor Plant Food for All Plants, Liquid Plant Food for Hous…
10. The Calathea: A Colorful Comeback
Calatheas are admired for their stunning leaf patterns, but they can lose their vibrancy without proper care. Reviving a fading Calathea can be a satisfying project, and it’s easier than you think. With the right adjustments, you can restore its colorful beauty.
Start by using distilled water to prevent leaf spots and increase humidity around the plant. Regular misting and adjusting care routines will enhance its appearance. These small changes can lead to a striking transformation in your home.
Helpful tips for nurturing your Calathea:
– Use distilled water to avoid mineral buildup on leaves.
– Boost humidity with a pebble tray or regular misting.
– Mist leaves often for a vibrant appearance.
Now, its leaves radiate with beautiful patterns, proving that with care, even the most delicate plants can thrive!
The Calathea: A Colorful Comeback
Editor’s Choice

2.11Gal Ultrasonic Cool Mist Humidifier with Timer and Humidistat for La…


Spray Bottle for Plants 2 Pack, 16oz – Ultra Fine Mist, Plant Mister Emp…
Conclusion
Transforming dying houseplants into thriving beauties is a journey filled with joy and satisfaction.
Each rescued plant tells a story of resilience and care, reminding us that with a little effort, anyone can create a lush indoor oasis.
So grab those pots and tools, and let these transformations inspire your own plant rescue adventures!
Note: We aim to provide accurate product links, but some may occasionally expire or become unavailable. If this happens, please search directly on Amazon for the product or a suitable alternative.
This post contains Amazon affiliate links, meaning we may earn a small commission if you purchase through our links, at no extra cost to you.
Frequently Asked Questions
What are the essential signs your houseplant is dying and in need of a rescue for a dramatic before after transformation?
When a plant shows distress, start with a simple diagnosis: drooping leaves, yellowing or brown tips, spots, or unusual leaf drop can signal under-watering, overwatering, or lighting issues in a rescued dying houseplant before after. Do a careful root check: gently tip the plant from its pot and inspect the roots. Trim away any black, mushy roots with clean scissors, then rinse the root ball. If most roots are rotten, you may need to start fresh with a clean pot and new, well-draining soil. Repot into a pot with drainage holes using a suitable mix (standard potting soil with perlite works for many houseplants; cactus mix for succulents). After repotting, wait a day or two before watering to avoid shocking the roots. Water only when the top inch of soil is dry, provide bright, indirect light, and maintain stable temperatures. Track progress over 4–6 weeks to see new growth—this is the classic rescued dying houseplant before after story in action.
With practice, you’ll turn warning signs into a thriving indoor plant revitalization journey and a real before and after plant makeover success.
What are the essential houseplant care tips to revive a rescued dying plant and turn it into a successful before and after plant makeover?
Focus on three pillars: water, light, and soil. Water only when the top inch of soil is dry, ensure the pot drains well, and avoid letting water sit in the saucer. Choose a light, well-draining soil mix and avoid heavy garden soil. Place the plant in bright, indirect light and rotate it weekly so all sides receive light. Increase humidity for tropicals with misting or a small humidifier. Begin light fertilization only after 4–6 weeks of recovery, using a balanced, diluted fertilizer. Regularly wipe leaves to remove dust, check for pests, and quarantine any new arrivals to protect your revival project. Following these houseplant care tips makes the rescue feasible and supports a lasting before and after plant makeover.
What practical plant rescue techniques can you use to revive a wilted plant without causing more harm?
Start with a calm, methodical approach: 1) isolate the plant from others to prevent pests, 2) assess roots and prune away any rotted tissue, 3) rinse and refresh the potting mix and repot in a clean pot, 4) improve drainage by adding perlite or bark as needed, 5) water properly and provide stable light, 6) consider propagating healthy cuttings if the main plant isn’t salvageable, 7) treat pests with gentle methods like insecticidal soap if needed, and 8) wipe leaves to remove residue. Maintain cleanliness and sterilize tools between plants to avoid spreading disease. These plant rescue techniques support a realistic before and after plant makeover outcome.
How long does indoor plant revitalization usually take, and what does a typical houseplant transformation stories timeline look like?
Most rescues show meaningful progress in about 4–12 weeks, depending on the species, root health, and how consistently you care for the plant. In the first 1–2 weeks, you may see reduced droop as roots recover. Weeks 3–6 often bring new growth and brighter leaves. By weeks 8–12, many plants regain vitality, turning a rescued dying houseplant before after into a cheerful transformation. Keep photos handy to document the journey and celebrate your houseplant transformation stories as you complete the indoor plant revitalization.
What common mistakes should be avoided during a rescued dying houseplant process to ensure a successful before and after transformation?
Avoid overwatering, using the wrong soil, or neglecting drainage, which can trigger root rot. Don’t place plants in direct, harsh sun or move them abruptly to very different light. Don’t skip root checks or pest management, and don’t fertilize too soon—let the plant recover first. Quarantine new plants to prevent pests from spreading. Keep a simple schedule for watering, light, and feeding, and monitor regularly. By sidestepping these mistakes, you’ll increase the odds of a thriving before and after transformation.
Related Topics
indoor gardening
plant rescue
houseplant care
before after transformation
revitalization techniques
beginner friendly
plant makeover
indoor plants
easy care tips
houseplant revival
transformation stories
green thumb